Saturday, May 19, 2007

Blowing My Own Horn

Flybridge Horn Switch, 5/19/2007

Our horn was connected only to the switch at the lower helm. We do most of our piloting from the flybridge, so I really needed to get a second switch wired in. There was a momentary (i.e., push-button) switch already in place on the panel, but it wasn't connected to anything.

To connect the switch, I ran another 16 AWG positive lead from the fuse panel in the wheelhouse up to the flybridge switch, and from the switch to the horn. At the horn, I used a 3-way butt connector to connect both switch wires to the horn's positive lead.

Thursday, May 10, 2007

New Old Posts

I'd like to turn this blog into a complete maintenance record, so soon I'm going to start adding new posts for the various restoration and repair work that I've done over the past year. I'm planning to backdate them to the actual completion dates, so if you're interested, come back and check the blog archive on the left for posts between 5/2006 and 4/2007.

Thursday, May 3, 2007

HOT HOT HOT

Water Heater, 4/29/2007

This tank and mess of hoses is our new water heater installation. We've never before had hot water on a boat, so we're thrilled!

The old tank was badly rusted and leaked when we tried to fill it. While we would have loved to have repaired that immediately, we had bigger fish to fry last season, so we just bypassed it and lived with cold water.

On our Cape Dory 28, the tank is installed under the aft part of the port side bench in the saloon. It's pretty tough to get down in there, particularly to the back side of the tank where the rear mounting screws are. So, Michele did the hard work, crawling into the deep recesses of the engine room where I couldn't fit, to remove the old mounting screws and fasten down the new tank. Fortunately, we were able to lift the tank up through the storage opening in the bench, and lower the new one through exactly the same way.

One cause of rusted water tank is that whenever water spills on the mounting surface, the metal casing sits in it, rusting away. We tried to combat that situation by getting a stainless steel tank, and by mounting it on rubber washers, eight total, to lift the tank slightly off the surface. If water spills or drips onto the surface, at least it won't be sitting directly in it.

The mess of hoses you see in the picture make for a complicated installation -- somewhat more complicated than necessary, as a matter of fact. Generally, there are four connections: water in, water out, engine coolant in, and engine coolant out. (The water heater is electric, but also has engine coolant connections that let coolant pump through a heat exchanger, heating the water whenever the engine is running.) We complicated the matter by including a permanent winter by-pass connection (the white hose). When winterizing the boat, we can just flip a valve on the bypass hose and drain the tank instead of filling it with non-toxic antifreeze.

This was definitely one of the more frustrating projects for me. First, some hoses needed re-routing, since the connections on new tank were in different position than those on the old tank. Some of the fittings were stripped or crossthreaded, so I needed to get new connectors. Then, I couldn't seem to get them all to stop leaking. Every time we tested the system, something leaked, requiring one of us to climb down there, disassemble it, and start again. Finally, we got advice from Michele's father, who suggested that we simply weren't using enough teflon tape on the connectors. He was right on, too. On our final attempt, we really layered it on thick, and that did the job.

Overall, it was a tough chore, but the reward has been well well worth it. We love having hot water on the boat!

Tuesday, May 1, 2007

Key Requirement

Wheelhouse Key, 4/30/2007

You'd think that having keys duplicated would be the easiest task on the list. But when you're dealing with a 20-year-old skeleton key for a boat whose builder no longer exists, it gets a little more complicated.

The wheelhouse on our Cape Dory takes just such a key, and unfortunately, the prior owner had only one. The folks at the local hardware store looked at me kind of funny when I presented it and asked for a copy. The nice man at the key cutting machine kindly suggested consulting a locksmith. I did, and he looked at me kind of funny too.

I spoke with some other Cape Dory owners, and one identified the blank for me as an "Ilco 53B". I was able to buy a few (well, four) of these on Ebay, and returned to the locksmith. He was skeptical, and offered 2 things: 1) to try to cut it for me, and 2) no guarantee. It didn't work. The main problem was the key is thicker than the original, and won't fit in the lock.

Here's the original:


Other than that, it's not really a complicated looking key. I since found a drawer full of miscellaneous blanks at the hardware store as well, and one of them looked pretty close. I decided to have at it with a dremel tool, and see what I could do on my own. After a reasonable looking attempt, I took a grinding stone to one of the Ilco blanks, and worked that one down a bit as well.

The results:


The top one is the Ilco, and the bottom one is what I found at the hardware store (also shown above on the keyring). It only took a year. Let's hope they work!

Friday, April 20, 2007

Spring Is In The Air

Recommission, 4/20/2007

Recommissioning for spring was a pretty smooth process. The bulk of the engine work was done in the fall, so spring only brought a few more chores.

The process began with shrinkwrap removal, a couple weeks before spring launch. It was just a matter of cutting the wrap down the center line with a carpet knife, and then cutting tie-down strings to release it. Michele and I cut the huge pieces of wrap into somewhat more manageable-sized pieces, rolled it up, and used the tie-down strings to tie the rolls. Carrying it to the recycle pile at the marina completed the job. Once unwrapped, we reattached a few things like the bimini frame and antennas, checked all the seacocks, hoses, etc, so the boat was ready to drop in the water. Shipwright finally launched the boat in mid-April, and we attended to the rest of the work almost immediately.

I started by draining the pink antifreeze from the potable water tank, adding a quart of bleach, and refilling with water. I ran some of the bleach/water solution through each of the taps to fill the pump and the lines with the solution, and then left it sitting until the next day.

The engine required the most work. The first task was making sure the engine would start. It fired right up and seemed to run smoothly, bringing a heavy sigh of relief! With that anxiety passed, it was time to change the fuel and air filters. Changing the filters was relatively quick, if a little messy. But diesel engines don't like air in the fuel lines, so whenever fuel filters are changed, the air must be purged. Having never done that, I was concerned that it would be a struggle, and it certainly was. To get the air out, one is supposed to loosen a vent screw on the fuel filter, and then operate a little mechanical "lift pump" until the air bubbles subside and fuel starts escaping from the vent. Well, I pumped. And pumped. And pumped. And pumped some more. This went on forever. I finally tried starting the engine, and although it fired up, it quickly died. My guess is that there is something wrong with the lift pump, because I never did succeed in purging the air. Ultimately, I ended up pouring filtered diesel into the filter itself and then reinstalling it. After that, a few cranks of the engine had it running again.

A quick test run of the air conditioner showed it working fine. Nothing else to do there.

The next day, Michele and I got an early start, cleaning and prepping, rehanging curtains, flushing the potable water system, etc. A few hours of this had us more than ready to set out on our first cruise of the year.

Saturday, April 14, 2007

Keep The Water On The Outside, Part 4: Hatch Gasket

Hatch Gasket, 4/14/2007

Hatches tend to develop leaks over time as gaskets get hardened or worn out. Such was the case with the Bomar hatch over our v-berth. The leak wasn't severe, but it was enough where we had to keep a towel over the cushions when away from the boat.

There are a number of ways hatches can leak. Ours, at first, appeared to be letting water underneath the rubber gasket on the hatch that presses against the hatch frame when it is closed. The old gasket, roughly 1/2" square, was hardened to where it didn't really compress at all.

The most difficult part of this repair was locating the right gasket, and the first step was identifying the brand and model of the hatch. Our owners manual identified it as a Bomar hatch, but did not provide a model number. Pompanette, the maker of Bomar hatches, was tremendously helpful in figuring out the model. Two phone calls plus an email with the attached pictures lead the representative there to conclude that this is a Bomar Hi-Profile hatch, requiring a "lip-gasket", part number p2000-26. I ordered 8 feet from a marine supply, and it was exactly the right stuff.

The old gasket pulled out easily, but left some glue-like residue behind that cleaned up pretty easily with a little WD-40 and Simple Green. I installed the new gasket following the included instructions, and it went in easily for the most part. The corners were tricky, but a small screwdriver helped in tucking the lip of the gasket into the notch between the frame and the glass. I found that it's important not to stretch the new gasket while installing it, or it will shrink back, pulling itself out of the groove when it does. The new gasket provided a much tighter seal.

Unfortunately, it seems that the extra pressure from the new gasket produced another leak, through the handles (called "hatch dogs") where they go through the glass. The handles are seated in o-rings, which are supposed to seal against water while still allowing them to turn. That is a straightforward fix: Unscrew and take apart the handles, replace o-ring, reinstall.

Now we have a dry bed!

Sunday, April 8, 2007

Prop Nut Zinc

Replaced Zinc, 4/8

Cape Dory 28' cruisers require only one sacrificial zinc anode to protect the underwater metals from corrosion. It's a "perry nut" type, on the end of the prop shaft. Last year's zinc was about 1/2 gone, so it needed to be replaced for the start of the season.

Our boat's shaft is 1 1/2" diameter, which takes a prop nut zinc size "F". I found it in a few places online, including Hamilton Marine and BoatZincs.com. The zinc is relatively inexpensive, at around $15. Generally, only the zinc needs replacing, not the entire bronze prop nut, which is much more costly at about $90.

See The Light (Part 2)

Stern light, 4/8/2007

In the fall, I installed a new combination masthead / all-round light, so that I could illuminate only the forward-facing portion (the masthead) while piloting at night. This setup requires a separate stern light, which I finally installed just before spring launch.

I ran the wiring for the stern light back in December while working on the cockpit courtesy lights, so most of this project was already done. I picked up an Aqua-signal Series 20 stern light (which matches the currently installed sidelights), and installed it on the transom. The transom is solid fiberglass, not cored, so simple screws weren't going to work very well. I had to drill through the transom to run the wires anyway, so I thru-bolted the light with 2.5" #6 stainless machine screws. On the inside, the nuts are under the gunwale anyway, so they don't affect the interior appearance. For a change, I managed to drill the holes without any serious fiberglass chipping. I put painter's tape over both sides (inside and outside), and drilled through from the outside. I scored the holes with the drill in reverse first, and then ran it forward to finish the holes. The inside chipped slightly when the drill went through, but nothing serious.

To finish the navigation lights project, I inspected the sidelights which needed a little maintenance. Both lenses needed cleaning, and the teak fairing block on the port side was cracked, so I repaired it with epoxy. I also picked up a spare bulb and added it to my emergency kit.

Now I can hardly wait for an opportunity to be out on the bay after dark. It's a completely different experience, and one that I loved in Seattle, so I'm looking forward to the bay at night!


Bronze Is Beautiful

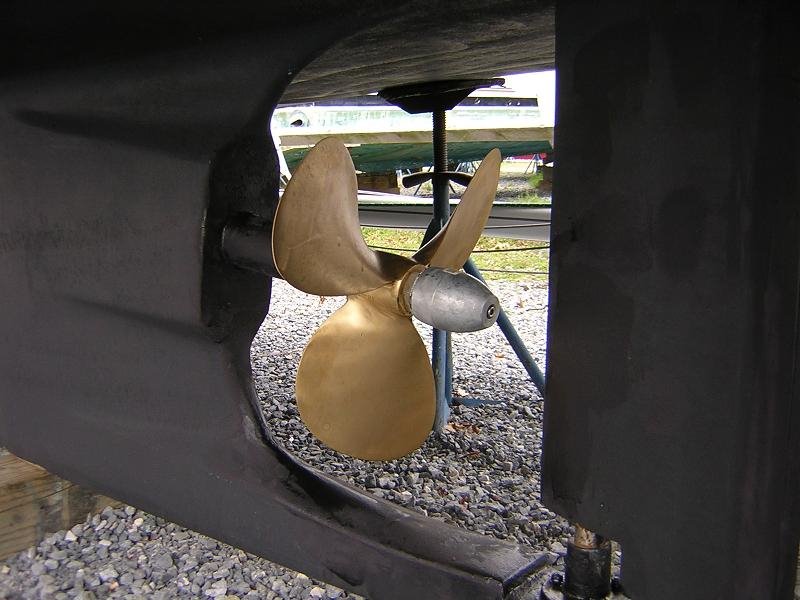
Propellor, 4/8/2007

Throughout our first summer ('06)
, we were never able to get the engine RPM up into the recommended range. Usually, that's a sign that you're "overpropped". Before launching this year, I had Digital Prop Shop recondition the prop and reduce the pitch from 18 to 16, which should let the engine spin up to the rated RPM. Also replaced the "prop nut zinc", a large sacrificial zinc on the prop nut, which helps prevent corrosion of other under water metals.

Cover Me

Canvas Repair, 1/6/2007

The Sailrite catalog arrived yesterday. I don't plan to do a lot of sail-making, but as I flipped through the catalog looking at all the interesting things in it, it occurred to me that what I like so much about doing our own maintenance is the freedom and independence it provides. We do whatever we want, with no worries about finding competent, affordable help.

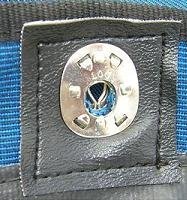
Our aft canvas was in rough shape. First of all, it was filthy. But more importantly, it was leaking and the fasteners were no longer doing their job. The velcro was falling apart, and the "lift-the-dot" snaps were tearing through the canvas (these snaps take a tremendous amount of strain holding almost the entire weight of the canvas in the air). My plan had been to take the whole thing to a canvas repair shop and have them restore it, but as I considered it more, it seemed like a managable "DIY" project, especially now that Michele has her handed-down sewing machine.

I scrubbed the whole thing in the backyard and it cleaned up nicely. I found velcro and marine grade vinyl at Jo-Ann fabrics, and new lift-the-dot snaps at Sailrite. Michele had a little sewing tool that worked great for cutting the thread to remove the old velcro, and I just used a screwdriver and pliers to remove the old snaps. Michele did all the sewing work to attach the new velcro and little vinyl reinforcements for the snaps, and I put the new snaps on. We sprayed the whole thing with 303 Fabric Guard, and ta-da, the canvas is like new!

Emboldened by our success, we bought new canvas material and snaps so we can try to make a canvas cover for the windshield from scratch. Looking forward to that!