Sunday, December 30, 2007

Shrinkage

I visited the boat yesterday, intending mainly just to check on it after a full unattended month. I had hoped the shrink wrap would be finished (with a zippered access door), so I could climb aboard and make sure there were no moisture problems inside. Shrink wrap sometimes results in condensation, which can lead to mildew and other problems.

The shrink wrap is done, and appears well-ventilated, but they didn't include an access door. I'm not sure if I forgot to request one, or if they missed it on the work order. No big deal, I'll add one myself. It will be cheaper that way anyway: I just ordered one from Dr. Shrink for $14.00.

I had also hoped to do a quick assessment of what I will need in order to complete some winter projects, but I guess I will have to wait until the zipper door arrives. As always, I have a list of projects a mile long. Some are important and will be done before spring launch. Some are just "nice-to-have" and can wait indefinitely if need be. On my project list, roughly in priority order:
  • Wiper motors. This is at the top of the list because, after last season, I consider it an important safety item. On several occasions (mainly head seas), visibility from the lower helm was seriously impaired by the broken port wiper. The starboard wiper, while functional, wasn't completely reliable either.
  • Electronics wiring. The GPS and VHF radio connections are not complete, which means our DSC capability is limited. Plus, although our GPS runs fine on it's rechargeable batteries, a constant connection to the on board batteries will be helpful in keeping it charged.
  • Impeller. I have no idea when the raw water impeller was last done. We've had the boat two seasons, so it's probably past due.
  • Exterior teak. The swim platform desperately needs refinishing. I think it will require complete sanding and three or four coats of Cetol Light. The remaining teak (the cabin door, flybridge steps, and flybridge seat) are in good shape, and just need a maintenance coat or two.
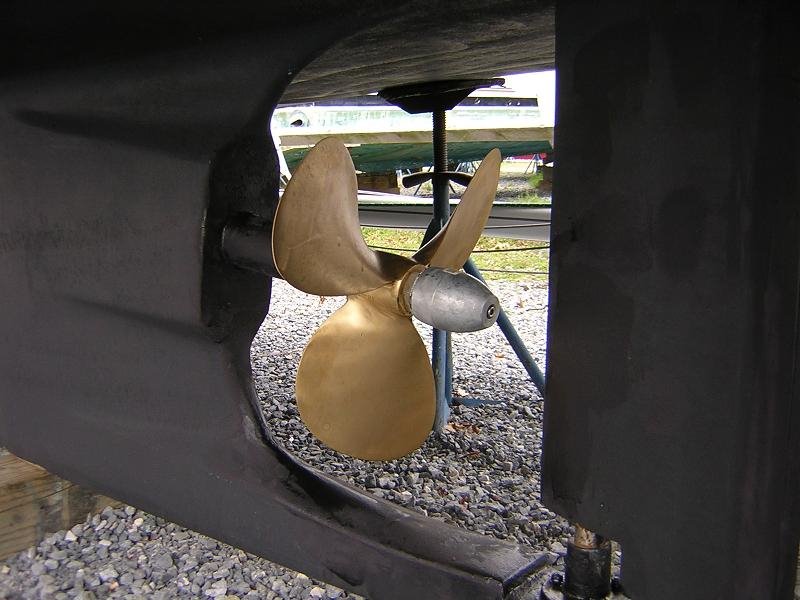
  • Bottom paint. As you can see in the picture below, the old paint is in decent condition, but it has worn worn off in some areas. A new coat or two in the spring should keep the bottom in good shape over the next season.
  • Starting battery. I initially purchased a single group 27 deep-cycle battery for the house, and group 27 dual-purpose for a starting battery. I've since concluded that this configuration is woefully inadequate. I plan to combine the two existing batteries for the house needs, and add a single group 31 for a new starting battery.
  • Battery charger outlet. Our battery charger currently plugs in to an outlet outside the port bench, and the cord gets in the way. I want to add an outlet inside the bench.
  • Backup bilge pump. One could argue that this should be higher on the list. We have a single bilge pump. If it ever fails, or if we have a catastrophic leak, we'll need a high-capacity backup.
  • Rebed windshield. Our center windshield leaks, so it needs to be removed and rebedded. Might be a major project, so I'm not sure it will get done this year.
  • Anchor roller. My back would thank me, but again, I'm not sure this will get done this year.
  • Chafe guards. Some of our lines are chafing where they run through chocks or around cleats.
  • Replace life jackets. Some of our life jackets still say "Cuanna", the boat's prior name.
  • Dri-dek for anchor locker. I want put down dri-dek panels in the anchor locker to protect the surface from the anchor, chain, etc.
  • Galley water filter. A water filter might improve the taste enough that we can skip the gallon jugs of drinking water.
  • Toilet paper holder. Inside the vanity in the head, where it won't get wet from showers.
  • Drink holders. For the flybridge.
  • FM antenna. Mostly we listen to our iRiver Clix anyway, but we have a nice new stereo, so it seems like it should have an antenna!
See what I mean? I always have an endless list. Anyway, the boat is shrinkwrapped. Boats look gigantic when out of the water, don't they?

Monday, November 26, 2007

Ready For Winter

Winterization, 11/25/2007

I was distracted by responsibilities at home last weekend, so I hadn't yet finished winterizing. I returned on Sunday with my father and Anthony (visiting for the holiday) for a quick cruise and to complete the remaining tasks. They were a big help, providing extra hands along the way.

I borrowed an oil change pump (a Jabsco flat tank, just like mine) from a friend at work. After a quick cruise, we set it to work while finishing off a few other tasks. I cleaned the sea water strainer, drained the raw water from the heat exchanger, and pulled the engine zincs. For the most part, the zincs were in good shape (better than 50% remaining), but they're inexpensive and a PITA to reach, so I changed them anyway before putting them back.

Good news: the oil change went fairly easily. Once I was reasonably sure that all of the oil was out of the engine, I moved the pump to the transmission oil and let it work there while I changed the main oil filter. Last time I changed the filter, I made quite a mess. This time, I took a layered approach: I set down an oil absorbent cloth, spread an opened trash bag over that, set a foil tray in the bag, and wrapped a 1-gallon ziploc around the filter while unscrewing it. The ziploc caught most of the oil, and the bit that I missed spilled fairly neatly into the foil pan. When it finished dripping, I installed the new filter and simply picked up the trash bag, letting the filter and foil pan fall right inside. Barely any spilled, so a few shop towels cleaned it right up.

After refilling the oil in the engine and transmission, I sucked 6 gallons of pink RV antifreeze through the raw water side, and then we called it a day.

Sunday, November 11, 2007

One And... Not Done

Winterization, 11/11/2007

We set out today to winterize the boat, hoping to finish in one day. Things didn't quite work out that way.

The fuel dock was first up. We filled the tank with diesel, and added biocide plus 32 oz. of Stabil. One interesting point here: our deck fitting for the fuel tank is narrow, and we usually look for fuel docks with a narrow nozzle to fit. Our normal fuel dock had only the wider high-capacity nozzle working this time, so we gave it a try. I just held it tightly against the opening, and it worked fine. Good to know. We then pumped out the holding tank, and returned to the dock.

While Michele put the final coat of Cetol on the toe rail and hand rails, I started winterizing the systems. We have a Jabsco Flat Tank 12-volt oil pump (see picture) for changing the engine oil. It has a nice 3.5 gallon tank, perfect for our 11 quart engine capacity, plus 2 quart transmission oil capacity. I set the oil pump running so that it could extract the warmed-up motor oil while I worked on other tasks. While it was pumping, I drained the water tank, bypassed the water heater, and ran pink RV antifreeze through the water system, the head, and the A/C.

When I returned to the oil pump, I was dismayed to find it nearly empty. It has worked ok (albeit slowly) in the past, but this time it failed. The oil just came through at a drip, and after more than an hour, it had extracted only about 1 quart of oil. Unfortunately, I'll need to return next weekend with another pump to finish the job. The good news: the unit is just a year old, and has a 3-year warranty. Kudos to Jabsco: I called them, and they're sending a new pump, no questions asked. Outstanding! I hope they follow through; I'll be sure to post an update.

Next weekend: Finish the oil change, drain the raw water from the engine, change the engine zincs, and run pink antifreeze through.

Finished Brightwork

Teak Maintenance, 11/11/2007
Michele finished the toe rail and hand rails today while I worked on winterization chores. They look great. There's a bit of bleed onto the gel coat, but not so noticeable in person. I might try cleaning it up with acetone.

The starboard hand rail looks just a bit lighter than the port hand rail due to the sanding. Again, not very noticeable in person.

Tuesday, November 6, 2007

Brightwork: Second Coat

Teak Maintenance, 11/4/2007

We returned on Sunday to apply the second coat of Cetol to the toe rail, hand rails, and cockpit steps. The second coat took the two of us just 90 minutes. There definitely appears to be some variation in color between the areas that were bare and those that still had original coatings. It doesn't look bad, but I certainly can notice it. Eh, probably I'm the only one who will care. Maybe a third coat next weekend will reduce the contrast. I'll take pictures of the finished areas next week.

The upper hand rails were in good shape, so they are done. After two coats, they really look nice! Applying a maintenance coat to sections that were already in good shape was easy. So easy, in fact, that we wish we hadn't put it off, despite the extensive list of more important work. The penalty for delay is just too high. We won't make that mistake again.

Still to do: flybridge steps, flybridge bench seat, wheelhouse door, and swim platform. That seems like a lot, but it really shouldn't be too bad. Everything except the swim platform is in good shape and should just require a maintenance coat or two. The platform will need a full sanding, so we may take it off and bring it home for the winter.

Monday, November 5, 2007

Brightwork

Teak Maintenance, 11/3/2007

"Bright it should be, and work it is." -- unknown

I'm not sure of the origin of that expression, but it aptly describes the dreaded task of maintaining teak on a boat. Often, other boaters look at the brightwork on a boat with mixture of admiration and pity. Teak is beautiful, but it also brings visions of endless sanding and varnishing. The finished product, of course, is quite rewarding. Or so I've heard.

Nowadays, pigmented coatings like Sikkens Cetol are a common compromise. The application and maintenance process is much easier, and the pigment protects the wood from UV. But, it lends a somewhat less appealing color than the mile-deep shine of traditional varnish. In our case, the decision to do it the easy way was made for us: The prior owner had already started with Cetol in 2004. Unfortunately, even with Cetol, we have our work cut out for us because we put off the project for too long, allowing the the finish to deteriorate quite badly in some areas. In those areas, bare teak has been exposed all year, and it has weathered gray. We really should have addressed the situation sooner, but we were otherwise occupied.

We started Saturday morning with the worst of it: the toe rail, hand rails, and cockpit steps. The hand rails were in mostly decent shape except for the forward-starboard rail, which was chipping and peeling pretty badly. The toe rail was moderately deteriorated all the way around. The deterioration increases the prep work substantially, since it requires sanding in addition to general cleaning. We followed these steps on all the deteriorated wood:
  • Scrub thoroughly with a scouring pad, mild boat soap, and water
  • Towel-dry
  • Sand with 150-180 grit sanding pads to remove any flaking, and to take weathered areas down to clean wood
  • Vacuum the dust
  • Wipe with acetone to clean any remaining dust or oils
  • Allow to air dry
  • Brush on first coat of Cetol Light with a natural bristle brush
We freehanded the Cetol application, rather than taping off all of the surrounding area. That seemed to be the unanimous recommendation from others, given the time and difficulty involved with taping. A shop towel dampened with acetone works great for cleaning up any mistakes.

The process took the two of us about four hours. Teak is pretty soft, so sanding was easier than I expected. We only sanded to the point where all the flaking areas of Cetol were removed, which left the wood partly coated, and partly bare (click the pictures for closeups). My hope is that this will be adequate, but I'm concerned that the bare areas will show lighter than the other areas when we're finished. I expect that we'll need three coats minimum on the bare areas.

Friday, October 26, 2007

Fuel Issues

Changed Racor Fuel Filter
Changed Secondary Fuel Filter
Changed Crankcase Breather
Changed Air Filter
10/13/2006


Replacing the shift cables went very smoothly, so my father-in-law and I finished that job faster than I had anticipated. That left time for a little more maintenance before Michele and her mother arrived for our trip over to Cambridge.

I've had some concerns about our engine recently. There was a noticeable power loss and an increasing amount of grayish smoke at cruising speed. That could be a sign of serious trouble (worn rings, bad or dirty injectors), or possibly just a fuel problem. I was considering calling a Volvo diesel mechanic, but wanted to get all the filters changed out first, to determine whether it was just a fuel problem.

We quickly changed out each of the filters: the Racor primary fuel filter, the secondary fuel filter on the engine, the crankcase breather, and the air filter. During this process, I also discovered that my prior difficulty bleeding the fuel lines wasn't a problem with the lift pump after all. Instead, it was "operator error" -- i.e., I wasn't doing it right. The pump lever has some play, and I was only moving it within that range. To actually work, it needs to be pushed down beyond that range, at which point it springs back up. I was very pleased to learn this and gain the peace-of-mind that comes with now fully understanding the bleed process in case I ever need to do it while out on the water.

I'm happy to report that this effort made a huge difference in engine performance. Our speed was back up, the engine ran smoothly, and the smoke was virtually gone. We're still only hitting ~3400 RPM instead of our rated 3600 at wide-open-throttle, but that may just be a result of marine growth on the hull, so I'll wait until we launch in spring with fresh bottom paint to determine whether there's a problem.

Shift

Replaced Flybridge Cables, 10/13/2007

On my trip with Chris, the flybridge shift cable broke during our anchoring maneuvers. It broke in forward gear, with the anchor plus 20' of chain and 30' of rope in the water off the bow. It was an exciting few minutes, and an important lesson not to postpone maintenance. The flybridge shift and throttle cables had been a little stiff for quite a while, and I was planning to do the replacement during the off-season. Surprise! This project is getting done ahead of schedule!

The cables are 3300-universal type, 10' long, and run from the flybridge controls to the lower controls. They are threaded on both ends, making attachment/adjustment fairly easy. I replaced them with new TFXtreme #CC63310 cables, from Teleflex Marine. People rave about these cables, and I found them at BoatFix.com for just $30 each.

My father-in-law, who is a whiz with all things mechanical, helped me install them. It was fairly straightforward job:
  • Removed the cover plates on the engine controls at both stations. There are set screws on each side, just above where the handles attach, that hold the cover in place.
  • Detached the throttle cable by removing the cotter pin and spinning off the threaded fitting that holds the cable at each station. (Chris and I removed the shift cable the prior week, so I could take it home and find a new one.)
  • Taped the new cables to the throttle cable and snaked them through from the lower helm up to the flybridge.
  • Attached the new cables. On this boat, the fittings on the flybridge are not adjustable. Once threaded on and attached, they do not turn, whereas the lower helm fittings turn with a screwdriver.
  • Adjusted the cable travel so that the shift and throttle levers hit their stops in both forward and backward positions, and so that the shift control is in its neutral detent at both helms.
  • Lubricated the controls with WD-40.
  • Reattached covers.
What an amazing difference! The TFXtreme cables allow a 4" bend radius, whereas other cables support only an 8" bend radius. Ours required a pretty tight bend at the lower station, so I think these cables were a great choice.

Sunday, September 30, 2007

More Gunk

Cleaned Racor Bowl, 9/30/2007

AGAIN. I just did this in August (see post below). We logged about 33 hours since then, which seems not unreasonable, but I'd still like to reduce or eliminate the buildup of sludge.

This time, I tried just draining the gunk from the bowl. I only managed to get a tiny bit to come out before the drain hole clogged, so I had to disassemble it again. At least that's getting easier each time. I now keep a box of disposable rubber gloves on board, and I just put a quart-size ziploc around the whole filter/bowl assembly, remove it, take it apart, clean the bowl, reassemble, top it off with fresh diesel, and reinstall. The ziploc catches the old diesel, and I just dispose of it at the marina waste oil collection.

It seems I really need to address this problem. The fuel tank may be dirty, or I might be taking on dirty fuel at the fuel pump. I ordered a Racor fuel funnel (RFF15C), which handles 12-15 gallons-per-minute and filters to 74 microns, so I plan to filter all diesel as it enters the tank from now on. I would assume that if the supply is clean, eventually the filters will clean out most of the gunk from the tank.

Monday, August 20, 2007

Gunk In Racor Bowl

Cleaned Racor Bowl, 8/14/2007

The racor bowl was full of gunk again. While we were in Crisfield during our vacation, I disassembled it and cleaned it out. Michele provided extra hands, which helped tremendously in avoiding the mess I created last time I did this in June. Fortunately, I was able to reassemble everything this time without replacing the cartridge. The o-ring and the gasket were a bit stretched, but everything went back together ok. Next time I may try draining the gunk through the bottom instead, but I'm not sure the gunk will come out that way. Hopefully, that won't be soon!

Sunday, August 19, 2007

Oil Change

Changed Engine Oil,
Changed Air Filter,
Topped Off Battery Water
8/9/2007


Used roughly 11 quarts of Chevron Delo multigrade 15w-40.

Wednesday, July 11, 2007

Stuff It

Repacked Stuffing Box
Replaced Racor Fuel Filter
6/30/2007


After the recent repair work, I'd been having trouble getting the stuffing box adjusted properly. I had just repacked it over the winter while the boat was on the hard, but I was concerned that the packing may have been compromised by the repairs. It's a cheap fix, so I repacked it again. This time, however, I changed the packing while the boat was in the water. Since the packing is what keeps the water out, that seems like a scary task, but it really wasn't bad. Having done the job before, I was confident that I'd be able to complete the job quickly and easily, with a little preparation. I laid out everything I needed near my workspace:
  • Gore GFO packing material, cut into rings in advance
  • Stuffing box wrenches
  • A rag and Simple Green for cleaning the shaft
  • A pick, a long screw, and a screwdriver (for removing the old packing)
  • An allen wrench for pushing the new packing into the box
I unscrewed the packing nut and slid it up the shaft. Water starting flowing in immediately, but not at an alarming rate. Working quickly, I cleaned the residue from the old packing material off of the shaft, and then tied the rag around the shaft to slow the water. The pick was not very helpful in removing the old packing, so I used the long screw instead. I screwed it into the old material until it gripped, and then used it to pull out the ring, repeating this step for each of the four rings of old packing material. Once all of it was removed, I wrapped each new ring around the shaft and slid it into the packing nut, using the allen wrench to push it all the way in. Once all four new rings were pushed in, I removed the rag and screwed the packing nut back down. I tightened it by hand until it no longer dripped, and then used the stuffing box wrenches to set the stop nut tightly against the packing nut. The whole thing went very smoothly, and the bilge pump easily kept up with the inflow of water (it only turned on twice).

Now, about the Racor filter... I just changed the filter in April when recommissioning for spring. The bowl, however, had collected a fair amount of debris or sludge since then, so I drained the filter and cleaned the bowl. I wouldn't have changed the filter, but the o-ring between the filter and the bowl was shot. Next time I'll see if I can buy a spare o-ring at the hardware store, since the filters are expensive, and it probably didn't really need to be replaced. I reassembled the bowl and filter, filled them with filtered diesel, and put them back on. The engine fired right up, with no need to purge air from the lines.

Wednesday, June 27, 2007

Bad Vibrations?

The repair took care of almost all of the shaft wobble. There is still a bit of movement (more like vibration), particularly in the 1200-1400 RPM range, but the problem is much improved. I'd like to get rid of the vibration too, but at least the situation is tolerable for now. If you look closely at this video, you can see what I mean. There is some vibration, but it's far better than what you see in the video in my last post. For now, I'll probably just monitor the problem and consider taking care of it in the off-season. If it worsens, maybe I'll reconsider.


I'm probably going to repack the stuffing box (again) this weekend, just to bring that back to baseline. The packing material is cheap, and the job is easy. It will help me eliminate possible causes if any problems continue.

Tuesday, June 26, 2007

Shafted

I was hoping I wouldn't have any maintenance or repairs to write about for a while. Our Rock Hall trip over Memorial Day, however, made it clear that I needed to address the shaft wobble immediately. Here's a video of the wobbling shaft at cruising speed.


I scheduled haul out and repair at Hartge Yacht Yard for June 11. My expectation was that the wobble was some combination of bad alignment, bent shaft, or worn cutless bearing. Luke Frey (the yard manager at Hartge) added bad engine mounts and prop damage to the possibilities.

You might be wondering why I scheduled the repair at Hartge instead of Bristol Marine, at my home marina. I've mentioned before that Bristol staff are slow to respond and rarely communicate. I asked them during the off season to do the prop work and inspect/replace the cutless bearing as needed. After considerable hounding, they finally did the prop in April, but not the cutless, which I stupidly took as indicating that the cutless bearing was ok. It looked real nice, too bad it wasn't done right. I actually called and emailed them about the shaft wobble, but didn't hear anything back for a full week, when I received a work order for a short haul to inspect the cutless bearing. Well, this wasn't what I asked for, and Hartge was already scheduled to do the work, so I cancelled the work order. The manager only acted annoyed, when he should have been concerned about a unsatisfied customer in his own marina.

Anyway, while anchored in the Rhode River prior to dropping the boat off at Hartge, I swam underneath to check out the running gear. I discovered the prop nut and new zinc were gone, strongly suggesting that the nut was not fastened correctly with a wire or cotter pin to keep it from spinning off. I was very fortunate that the prop itself wasn't lost. That was the last straw. In addition to the extra haulout expense and lost summer time, I'm now out $80 for a new prop nut. I am done with Bristol. If I get around to having a frank conversation with the yard manager at Bristol, maybe he can convince me to give them another try.

Stay tuned, I'll post an update soon on the outcome of the repair.

Saturday, May 19, 2007

Blowing My Own Horn

Flybridge Horn Switch, 5/19/2007

Our horn was connected only to the switch at the lower helm. We do most of our piloting from the flybridge, so I really needed to get a second switch wired in. There was a momentary (i.e., push-button) switch already in place on the panel, but it wasn't connected to anything.

To connect the switch, I ran another 16 AWG positive lead from the fuse panel in the wheelhouse up to the flybridge switch, and from the switch to the horn. At the horn, I used a 3-way butt connector to connect both switch wires to the horn's positive lead.

Thursday, May 10, 2007

New Old Posts

I'd like to turn this blog into a complete maintenance record, so soon I'm going to start adding new posts for the various restoration and repair work that I've done over the past year. I'm planning to backdate them to the actual completion dates, so if you're interested, come back and check the blog archive on the left for posts between 5/2006 and 4/2007.

Thursday, May 3, 2007

HOT HOT HOT

Water Heater, 4/29/2007

This tank and mess of hoses is our new water heater installation. We've never before had hot water on a boat, so we're thrilled!

The old tank was badly rusted and leaked when we tried to fill it. While we would have loved to have repaired that immediately, we had bigger fish to fry last season, so we just bypassed it and lived with cold water.

On our Cape Dory 28, the tank is installed under the aft part of the port side bench in the saloon. It's pretty tough to get down in there, particularly to the back side of the tank where the rear mounting screws are. So, Michele did the hard work, crawling into the deep recesses of the engine room where I couldn't fit, to remove the old mounting screws and fasten down the new tank. Fortunately, we were able to lift the tank up through the storage opening in the bench, and lower the new one through exactly the same way.

One cause of rusted water tank is that whenever water spills on the mounting surface, the metal casing sits in it, rusting away. We tried to combat that situation by getting a stainless steel tank, and by mounting it on rubber washers, eight total, to lift the tank slightly off the surface. If water spills or drips onto the surface, at least it won't be sitting directly in it.

The mess of hoses you see in the picture make for a complicated installation -- somewhat more complicated than necessary, as a matter of fact. Generally, there are four connections: water in, water out, engine coolant in, and engine coolant out. (The water heater is electric, but also has engine coolant connections that let coolant pump through a heat exchanger, heating the water whenever the engine is running.) We complicated the matter by including a permanent winter by-pass connection (the white hose). When winterizing the boat, we can just flip a valve on the bypass hose and drain the tank instead of filling it with non-toxic antifreeze.

This was definitely one of the more frustrating projects for me. First, some hoses needed re-routing, since the connections on new tank were in different position than those on the old tank. Some of the fittings were stripped or crossthreaded, so I needed to get new connectors. Then, I couldn't seem to get them all to stop leaking. Every time we tested the system, something leaked, requiring one of us to climb down there, disassemble it, and start again. Finally, we got advice from Michele's father, who suggested that we simply weren't using enough teflon tape on the connectors. He was right on, too. On our final attempt, we really layered it on thick, and that did the job.

Overall, it was a tough chore, but the reward has been well well worth it. We love having hot water on the boat!

Tuesday, May 1, 2007

Key Requirement

Wheelhouse Key, 4/30/2007

You'd think that having keys duplicated would be the easiest task on the list. But when you're dealing with a 20-year-old skeleton key for a boat whose builder no longer exists, it gets a little more complicated.

The wheelhouse on our Cape Dory takes just such a key, and unfortunately, the prior owner had only one. The folks at the local hardware store looked at me kind of funny when I presented it and asked for a copy. The nice man at the key cutting machine kindly suggested consulting a locksmith. I did, and he looked at me kind of funny too.

I spoke with some other Cape Dory owners, and one identified the blank for me as an "Ilco 53B". I was able to buy a few (well, four) of these on Ebay, and returned to the locksmith. He was skeptical, and offered 2 things: 1) to try to cut it for me, and 2) no guarantee. It didn't work. The main problem was the key is thicker than the original, and won't fit in the lock.

Here's the original:


Other than that, it's not really a complicated looking key. I since found a drawer full of miscellaneous blanks at the hardware store as well, and one of them looked pretty close. I decided to have at it with a dremel tool, and see what I could do on my own. After a reasonable looking attempt, I took a grinding stone to one of the Ilco blanks, and worked that one down a bit as well.

The results:


The top one is the Ilco, and the bottom one is what I found at the hardware store (also shown above on the keyring). It only took a year. Let's hope they work!

Friday, April 20, 2007

Spring Is In The Air

Recommission, 4/20/2007

Recommissioning for spring was a pretty smooth process. The bulk of the engine work was done in the fall, so spring only brought a few more chores.

The process began with shrinkwrap removal, a couple weeks before spring launch. It was just a matter of cutting the wrap down the center line with a carpet knife, and then cutting tie-down strings to release it. Michele and I cut the huge pieces of wrap into somewhat more manageable-sized pieces, rolled it up, and used the tie-down strings to tie the rolls. Carrying it to the recycle pile at the marina completed the job. Once unwrapped, we reattached a few things like the bimini frame and antennas, checked all the seacocks, hoses, etc, so the boat was ready to drop in the water. Shipwright finally launched the boat in mid-April, and we attended to the rest of the work almost immediately.

I started by draining the pink antifreeze from the potable water tank, adding a quart of bleach, and refilling with water. I ran some of the bleach/water solution through each of the taps to fill the pump and the lines with the solution, and then left it sitting until the next day.

The engine required the most work. The first task was making sure the engine would start. It fired right up and seemed to run smoothly, bringing a heavy sigh of relief! With that anxiety passed, it was time to change the fuel and air filters. Changing the filters was relatively quick, if a little messy. But diesel engines don't like air in the fuel lines, so whenever fuel filters are changed, the air must be purged. Having never done that, I was concerned that it would be a struggle, and it certainly was. To get the air out, one is supposed to loosen a vent screw on the fuel filter, and then operate a little mechanical "lift pump" until the air bubbles subside and fuel starts escaping from the vent. Well, I pumped. And pumped. And pumped. And pumped some more. This went on forever. I finally tried starting the engine, and although it fired up, it quickly died. My guess is that there is something wrong with the lift pump, because I never did succeed in purging the air. Ultimately, I ended up pouring filtered diesel into the filter itself and then reinstalling it. After that, a few cranks of the engine had it running again.

A quick test run of the air conditioner showed it working fine. Nothing else to do there.

The next day, Michele and I got an early start, cleaning and prepping, rehanging curtains, flushing the potable water system, etc. A few hours of this had us more than ready to set out on our first cruise of the year.

Saturday, April 14, 2007

Keep The Water On The Outside, Part 4: Hatch Gasket

Hatch Gasket, 4/14/2007

Hatches tend to develop leaks over time as gaskets get hardened or worn out. Such was the case with the Bomar hatch over our v-berth. The leak wasn't severe, but it was enough where we had to keep a towel over the cushions when away from the boat.

There are a number of ways hatches can leak. Ours, at first, appeared to be letting water underneath the rubber gasket on the hatch that presses against the hatch frame when it is closed. The old gasket, roughly 1/2" square, was hardened to where it didn't really compress at all.

The most difficult part of this repair was locating the right gasket, and the first step was identifying the brand and model of the hatch. Our owners manual identified it as a Bomar hatch, but did not provide a model number. Pompanette, the maker of Bomar hatches, was tremendously helpful in figuring out the model. Two phone calls plus an email with the attached pictures lead the representative there to conclude that this is a Bomar Hi-Profile hatch, requiring a "lip-gasket", part number p2000-26. I ordered 8 feet from a marine supply, and it was exactly the right stuff.

The old gasket pulled out easily, but left some glue-like residue behind that cleaned up pretty easily with a little WD-40 and Simple Green. I installed the new gasket following the included instructions, and it went in easily for the most part. The corners were tricky, but a small screwdriver helped in tucking the lip of the gasket into the notch between the frame and the glass. I found that it's important not to stretch the new gasket while installing it, or it will shrink back, pulling itself out of the groove when it does. The new gasket provided a much tighter seal.

Unfortunately, it seems that the extra pressure from the new gasket produced another leak, through the handles (called "hatch dogs") where they go through the glass. The handles are seated in o-rings, which are supposed to seal against water while still allowing them to turn. That is a straightforward fix: Unscrew and take apart the handles, replace o-ring, reinstall.

Now we have a dry bed!

Sunday, April 8, 2007

Prop Nut Zinc

Replaced Zinc, 4/8

Cape Dory 28' cruisers require only one sacrificial zinc anode to protect the underwater metals from corrosion. It's a "perry nut" type, on the end of the prop shaft. Last year's zinc was about 1/2 gone, so it needed to be replaced for the start of the season.

Our boat's shaft is 1 1/2" diameter, which takes a prop nut zinc size "F". I found it in a few places online, including Hamilton Marine and BoatZincs.com. The zinc is relatively inexpensive, at around $15. Generally, only the zinc needs replacing, not the entire bronze prop nut, which is much more costly at about $90.

See The Light (Part 2)

Stern light, 4/8/2007

In the fall, I installed a new combination masthead / all-round light, so that I could illuminate only the forward-facing portion (the masthead) while piloting at night. This setup requires a separate stern light, which I finally installed just before spring launch.

I ran the wiring for the stern light back in December while working on the cockpit courtesy lights, so most of this project was already done. I picked up an Aqua-signal Series 20 stern light (which matches the currently installed sidelights), and installed it on the transom. The transom is solid fiberglass, not cored, so simple screws weren't going to work very well. I had to drill through the transom to run the wires anyway, so I thru-bolted the light with 2.5" #6 stainless machine screws. On the inside, the nuts are under the gunwale anyway, so they don't affect the interior appearance. For a change, I managed to drill the holes without any serious fiberglass chipping. I put painter's tape over both sides (inside and outside), and drilled through from the outside. I scored the holes with the drill in reverse first, and then ran it forward to finish the holes. The inside chipped slightly when the drill went through, but nothing serious.

To finish the navigation lights project, I inspected the sidelights which needed a little maintenance. Both lenses needed cleaning, and the teak fairing block on the port side was cracked, so I repaired it with epoxy. I also picked up a spare bulb and added it to my emergency kit.

Now I can hardly wait for an opportunity to be out on the bay after dark. It's a completely different experience, and one that I loved in Seattle, so I'm looking forward to the bay at night!


Bronze Is Beautiful

Propellor, 4/8/2007

Throughout our first summer ('06)
, we were never able to get the engine RPM up into the recommended range. Usually, that's a sign that you're "overpropped". Before launching this year, I had Digital Prop Shop recondition the prop and reduce the pitch from 18 to 16, which should let the engine spin up to the rated RPM. Also replaced the "prop nut zinc", a large sacrificial zinc on the prop nut, which helps prevent corrosion of other under water metals.

Cover Me

Canvas Repair, 1/6/2007

The Sailrite catalog arrived yesterday. I don't plan to do a lot of sail-making, but as I flipped through the catalog looking at all the interesting things in it, it occurred to me that what I like so much about doing our own maintenance is the freedom and independence it provides. We do whatever we want, with no worries about finding competent, affordable help.

Our aft canvas was in rough shape. First of all, it was filthy. But more importantly, it was leaking and the fasteners were no longer doing their job. The velcro was falling apart, and the "lift-the-dot" snaps were tearing through the canvas (these snaps take a tremendous amount of strain holding almost the entire weight of the canvas in the air). My plan had been to take the whole thing to a canvas repair shop and have them restore it, but as I considered it more, it seemed like a managable "DIY" project, especially now that Michele has her handed-down sewing machine.

I scrubbed the whole thing in the backyard and it cleaned up nicely. I found velcro and marine grade vinyl at Jo-Ann fabrics, and new lift-the-dot snaps at Sailrite. Michele had a little sewing tool that worked great for cutting the thread to remove the old velcro, and I just used a screwdriver and pliers to remove the old snaps. Michele did all the sewing work to attach the new velcro and little vinyl reinforcements for the snaps, and I put the new snaps on. We sprayed the whole thing with 303 Fabric Guard, and ta-da, the canvas is like new!

Emboldened by our success, we bought new canvas material and snaps so we can try to make a canvas cover for the windshield from scratch. Looking forward to that!

Saturday, April 7, 2007

Launch?

April 7 and the forecast is... snow?! The boat was supposed to be launched this week, and I was planning to recommission the engine and other systems this weekend. Not sure if the yard actually got to it or not -- might still be on the hard. The freshwater system already has water in it. Hopefully the temps won't be cold enough to do any damage. I guess I'll be waiting until next weekend!

Friday, April 6, 2007

What's Done Is Done

Here's the list of work I've done on the boat during the first year. If I think of anything I forgot, I'll update it later. Eventually, I'll probably make a separate post for most of the items, describing the work that each involved. Some of this is repair/restoration work. Some is basic maintenance. Some doesn't even qualify as maintenance, just routine tasks (like pumping out the holding tank) that I included because I needed to figure out how to do it. Michele helped with a lot of this list -- she's not afraid to get her hands dirty, that's for sure!
Wow! I get tired each time I look at that. I'm pretty anal about getting the boat shipshape, so some of the work I brought upon myself. Lots of it, however, was required by BoatU.S. insurance. Gale Browning, the surveyor who did our pre-purchase survey, was very thorough and provided a laundry list of things like this that needed attention.

These are things I still plan to do. By no means a comprehensive list...

Sunday, March 25, 2007

What's In A Name?

Removed Old Name Decal, Waxed Hull, 3/25 - 3/25/2007

Renaming a boat is generally considered bad luck, but I'm not all that superstitious. The real hurdle to renaming, in my mind, is the work involved in removing the old name. In our case, the prior owner named the boat "Cuanna", and applied the name decal, in huge font, to the transom. In addition, the home port "Annapolis, MD" appeared below the name.

The low tech approach for removing vinyl decals is to heat with a hair dryer and scrape them off with a plastic scraper. I tried that (and it worked fine on our old boat), but it was painfully difficult and slow in this case. The fancy solution is a 3M stripe removal tool. The tool is essentially a wheel, made of layers of eraser-like material, that attaches to a drill (3M actually recommends a high-rpm air tool, but my 1200 RPM drill worked fine). It still took some time and effort to remove the decals, but for $20, this was definitely the way to go. It makes an unbelievable mess, so if you do something like this, I recommend a painters suit or at least long sleeves. Once the bulk of the decal was gone, wiping with acetone removed the rest of the adhesive.

Following that effort, Michele and I cleaned and waxed the hull for the first time since our purchase. What an exhausting chore! The hull was a bit oxidized, so we made three full passes: wash, 3M Cleaner & Wax, 3M High Performance Paste Wax. We applied the cleaner/wax with a terry cloth bonnet on a random orbital buffing tool, then applied the paste wax by hand, buffing it out with a clean terry cloth bonnet on the buffing tool, some touch-up buffing by hand, and a final pass with a lambswool bonnet. On the transom, I made one last pass with Starbrite Teflon, in hopes that the teflon coating would help prevent sooting from the diesel exhaust.


Here's a shot of the transom with the letters removed and the new stern light installed. It all turned out great, but wow were we sore on Monday.

Keep The Water On The Outside, Part 3: Stanchion Bases

Rebed Stanchion Bases, 3/18 - 3/25/2007

I was absolutely dreading this project, concerned that it would be a disaster. The bow railing includes vertical supports (stanchions), mounted to the deck in 8 locations. The stanchion bases are attached with bolts into the cabin below, and sealed against water intrusion. Two of the bases on the starboard side were not sealed properly, so water was getting into the cabin in heavy rain or heavy seas. My main concern was whether I'd be able to break apart the bases from the deck to remove the old sealant. If the prior job was done with a permanent adhesive like 3M 5200, removal would be very difficult and likely to damage the deck. Fortunately, they came up easily, so it seems the prior seal was done with something more appropriate.

Rebedding deck hardware is not a trivial task, but it is a manageable two-person task. The hardware is through-bolted into the cabin, so removal and reassembly requires two people: one on the outside with a screwdriver, and one on the inside with a wrench.

Here's a description of the process Michele and I followed. Hopefully it will be helpful to others who have to tackle the same project.
  1. Remove old fasteners, using a screwdriver on deck, and a wrench from below. Sometimes, just getting to the nuts on the underside is difficult, but Cape Dory provided reasonable access.
  2. Remove old adhesive with a scraper and/or sandpaper. Scuff the surface to provide some grip for new adhesive.
  3. Wipe up any dust or residue with acetone.
  4. Examine deck for coring issues. If the deck is soft, the coring must be repaired. Otherwise, it's generally considered best to overdrill the fastener holes (or just dig out some of the wood core around them), fill with epoxy, and then drill new holes through the epoxy for the fasteners. This way, the epoxy prevents any intruding water from getting in the wood core. In our case, it appeared that this had already been done -- the wood core looked sealed already.
  5. Place wide painter's tape over the area where the base will sit. Then place the base down on top of it, and score the tape (don't damage the fiberglass!) around the edge of the base. Lift the base, and remove the circle of tape from underneath the base, leaving an outline of the tape to protect the surrounding area.
  6. Apply a polysulfide sealant, such as 3M 101. Using a putty knife, spread a layer of sealant on both the deck and the underside of the stanchion base. Apply a small amount to the underside of the bolt heads as well.
  7. Gently set the base against the deck and insert the bolt. Be careful not to apply to much pressure, or all the sealant will squeeze out.
  8. Have helper place a backing plate over the screws from the inside, and thread on nylon locknuts. (At minimum, use big fender washers for the backing plate.) Snug the locknuts, but do not tighten. It's best to turn the nuts, not the bolts, so that the sealant under the bolt heads does not come out.
  9. Remove tape from around the base, lifting any squeezed out sealant.
  10. Wait a minimum of one week for the sealant to cure. Protect from rain if possible, but a good sealant will cure even if wet.
  11. Have one person hold the bolt heads firmly with the screwdriver, while the other person tightens the nuts from the inside. Again, turn the nuts, not the bolts. At this point, it is crucial not to break the seal under the bolt heads. The nuts should be tightened firmly and securely, but not so much that the deck compresses.
Once completed, there should be a nice layer of flexible, cured sealant squeezed down tightly between the base and deck.

Sunday, March 18, 2007

Now Hear This

Electronics, March/April 2007

Our boat, at the time of our purchase, included only basic electronics: depth sounder, VHF radio (lower helm only), and LORAN. This was enough to get us by for our limited use during the first season, but we had to do all our navigation by charts and compass, and step down to the lower helm any time we needed to use the radio. Upgrades were certainly in order.

Our adventures on the bay don't demand a whole lot, but minimally I wanted a new VHF with DSC capability, an extension microphone for the flybridge, and a GPS. Down the line, I'd like to add RADAR and another depth display (possibly on the GPS) for the flybridge. The GPS was a bit of a dilemma, though, as I wanted a display at both helms without having to program routes and waypoints on two separate machines. The only choices that meet those requirements are a networked system (big bucks), or a portable that can be moved between helms.
  • For the VHF radio, I chose a Standard Horizon Quest-X GX-1500S, with a RAM+ extension microphone. Some makers, like Uniden, offer a wireless extension microphone. That sounds great (easy to install, at any rate), but brings two drawbacks in my mind. First, you have to keep the remote charged somehow, which means some kind of wiring anyway. Second, wireless means it can be dropped overboard. That would be an expensive contribution to Davy Jones' locker!
  • For the GPS, I went with a Garmin 478. It includes a built in antenna, all coastal chart data, separate marine and auto mounts, and rechargeable batteries. The benefit of batteries is that it can be removed from the mount and transferred to the other helm without ever turning it off.
Installation raised only one serious issue. The old electronics, attached to the ceiling above the helm, had wires routed through the cabin headliner. Nightmare. I removed a molding strip, peeked above the vinyl headliner, and realized that the entire panel would have to come down to get at the wiring. With some trepidation, I went with an alternate plan: I drilled a hole (with a 1" holesaw) in the column used for routing wires to the bridge. This turned out to be a piece of cake, and vastly simplified installation. The only complication is ensuring that that, while drilling, no wires or cables already in the column are damaged. To protect them, I took several layers of heavy cardboard and inserted them into the column to shield the existing wires. A rubber grommet dressed up the hole, and all the new wires were routed easily. Removing old wires was as simple as cutting off the connectors and pulling them through; they pulled out easily without disturbing the headliner.

I installed the VHF right where the old one was. The LORAN is now in a box in my basement, destined to be a collector's item. The depth sounder moved to the right, where the LORAN was. Since the roof is curved, I added spacers to the left side of each so that they are more level. I kept the GPS down at the helm, where it would be more easily visible and have a clearer view of the satellites through the cabin windows. I expected to have to buy an additional marine mount, but as it turned out, the automotive mount worked perfectly well at the lower helm. It also came with a "beanbag" mount, which works perfectly fine in the car, so we can easily take it along for road trips as well.

I have two steps yet to do:
  • I have not connected the power cables for the GPS. For now, it will run on the rechargeables at both helms.
  • I want to connect the GPS and VHF together. Once done, the DSC automated distress signal from the VHF will include position data from the GPS. Likewise, any DSC calls that we receive will display position data on the GPS.
These, however, are projects for another day.

Saturday, March 17, 2007

Sounds Good

Replaced Stereo, 3/17/2007

The old stereo was dead. I swear it worked when the boat was surveyed, but we had to live without it for the first season.

The stereo is in the cabin, just above the galley area, well-protected from the weather. In general, a marine stereo would be a better choice to stand up to salt air and spray, but since this one is so well protected, I used a regular car stereo (a Sony CDX-GT310). I chose this one for three reasons: 1) it plays CDs, 2) it's satellite ready, and 3) it has a front aux input for an MP3 player. OK, four reasons: I got it for about $100.

I had to file the box opening just a little bit to make it fit. The speaker wiring was a bit of a mess, and it appeared that the old wire was split between the front (cabin) and rear (cockpit) speakers. Generally, that's not good for the amp, so I also ran new speaker wire to each of the speakers. Now I just need to spring for an MP3 player. I have my eye on an iRiver Clix2 -- can't wait for the 8GB model!

Saturday, January 13, 2007

Keep The Water On The Outside, Part 2: Stuffing Box

Repacked Stuffing Boxes, 1/13/07

Where the drive shaft and rudder shaft pass through the hull to the underside of the boat, there is a stuffing box that prevents water from entering. This is essentially just a hollow nut around the shaft, in which packing material is compressed to prevent water intrusion. Tightening down the nut compresses the packing. Typically, for a drive shaft, the nut is tightened to the point where the packing allows one or two drops of water per minute into the bilge. The water keeps the stuffing box cool and the packing material lubricated. Eventually, however, the packing material becomes old, hardened, and brittle to the point where it no longer does the job. At that point, new packing is in order.

The picture here is looking down on the rudder post. The reflection is the water that shouldn't be there. Over our first summer, I tried tightening the packing nut, but it didn't prevent the inflow of water. I repacked both the rudder and shaft stuffing boxes while the boat was out of the water for winter. It can be done in the water, but it's a bit more frantic, since water flows in at a pretty decent rate.

The best description of repacking I've ever seen is here: Re-Packing A Traditional Stuffing Box Unfortunately, this wasn't available when I did mine, but I muddled through anyway. I initially ordered the wrong size packing, but after exchanging for the right stuff, it wasn't bad. On some boats, the hardest part is being able to reach the stuffing box (particularly V-drives, where the engine is directly above it). Other than that, it's definitely easy DIY.